Grant Tracking
For customers who are using Non-Profit Fund Accounting (NPFA) and the Space module, the new grant tracking feature provides the ability to track how grants are used to pay for a space. Grant tracking is only available for spaces where complex allocations are defined and can be associated with either a space function method layer or an allocated individual method layer.
Grant tracking provides the ability to:
- Track how grants are allocated for spaces
- Generate valuable data that can be used for reporting purposes or grant applications
Using the grant tracking functionality, your organization can benefit from cost savings resulting from efficient allocation planning, improved fund management for grants, and better decision-making based on complex reporting capabilities.
 Configurations for Grant Tracking
To use grant tracking, the following configurations must be defined:
- Create the appropriate space functional categories – Grant tracking can only be defined for spaces where the selected space functional category requires account information to be defined. You can optionally require an allocated individual as well.
- Create the appropriate account group – To implement grant tracking, you must define an account group whose billing entity is a complex allocation.
- Add the appropriate account segments and segment values – Account segments and segment values can be added to the account group to allow you to add accounts to an allocation layer that associates it with a particular grant.
Create a Space Functional Category
Grant tracking requires a space to have complex allocations defined that are associated with either a space function or with an allocated individual nested within a space function. To define a functional category that can be used for grant tracking, certain flags must be specified when defining it.
To create a space functional category that can be used for grant tracking:
-
Open the Functional Category and Subcategory page by selecting Functional Categories under the Space Admin heading on the Admin Menu page.
-
Click the Add Category link.
The Add Category dialog box opens
-
Specify the category Name, Tab Order, Active flag, Number, and Description.
-
Set the Requires Account flag to Yes.
Setting this flag to Yes will cause an Accounts pane to display on the space function method layer when the complex allocation is defined. This will allow you to associate grant-specific accounts with the space function allocation layer. -
Set the Requires Allocated Individual flag to Yes if the category will be used for grant tracking on an allocated individual level nested within this category.
Setting this flag to Yes will cause an Accounts pane to display on the nested allocated individual method layer (instead of the space function method layer) when the complex allocation is defined. This will allow you to associate grant-specific accounts with the allocated individual allocation layer.
-
Click Add to create the functional category.
Create an NPFA Account Group
The next step in setting up grant tracking is to define a new account group that associates a set of account segments with the complex allocation billing entity. This will allow grant-specific account segments and segment values to be associated with the appropriate complex allocation layer.
To create an NPFA account group:
-
Open the Account Groups page by selecting Account Groups under the NPFA Admin heading on the Admin Menu page.
-
Click the Add Account Group link.
The Add Account Group dialog box opens
-
In the Account Group field, enter a name for the account group.
The account group name must be unique. -
In the Account Entity field, select Complex Allocation.
This will allow the account segments and segment values that are associated with a specific grant to be selected when a complex allocation is created.
An account entity can only be specified during the creation of a new account group. It cannot be modified later
-
Specify the rest of the account group fields.
-
Click Add to create the account group.
Create Account Segments and Account Segment Values
Once you have created a complex allocation-based account group, you can then select account segments and account segment values for that group. The account segments/values you select should be those that your institution associates with grants you want to track. When a complex allocation layer intended to track grants is created, these segments and values will be the only options that can be chosen when associating an account with the allocation layer.
You can either create new account segments and segment values or use existing account segment values. If you need to create new account segments and segment values, you can do so by clicking a Configuration link to open the Account Segments page.
You can narrow the set of values that users see when they are selecting account segment values on grant-tracking allocation layers.
- If you specify a value for Functional Category, the segment value only displays when this functional category is selected as the functional category for the associated allocation layer. In addition, if you associate one or more segment values with this functional category, only those values can be chosen when this functional category is selected. Otherwise, any segment value can be selected.
- If you specify a value for User, this segment value only displays when this user is selected as the allocated individual for the associated allocation layer. In addition, if you associate one or more segment values with this user, only those values can be chosen when this allocated individual is selected. Otherwise, any segment value can be selected.
Set Up a Grant Tracking Complex Allocation
Once you have configured the appropriate functional categories, allocation group, account segments, and segment values, you can create complex allocations that will track to accounts associated with specific grants.
To set up a grant tracking complex allocation:
-
Find and open the space you want to add grant tracking to.
-
In the Complex Allocations pane, click the Add Complex Allocation link.
-
Enter the Description, Start Date, and (optional) End Date for the complex allocation.
-
Click the Add New Method Layer link to create a complex allocation that will be used for grant tracking.
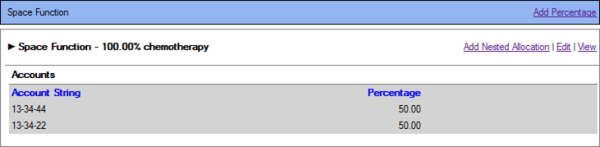
If you want to associate the grant tracking accounts with a space functional category:
-
In the Allocation Method field, select Space Function.
-
In the Space Functional Category field, select a space functional category that you set up for grant tracking (where Requires Account = Yes).
If you select the appropriate type of category, the Accounts pane is added to the bottom of the dialog box.
-
In the Space Functional Subcategory field, select a space functional subcategory.
You can select any subcategory; it does not need to be specifically configured for grant tracking.
-
In the Percentage field, enter the percentage for this allocation.
The percentage values you define must add up to 100%.
-
In the Accounts pane, click the Add New link.
The Add Account Detail dialog box opens, allowing you to select values for all the account segments and define the percentage for this account string. Only those segment values that were associated with the selected functional category are available.
-
Click OK and define additional account strings, if needed.
-
Click Submit to save the complex allocation method layer.
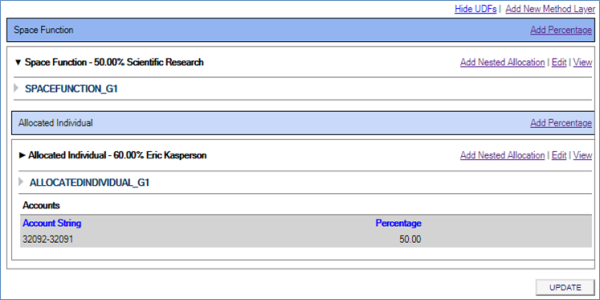
If you want to associate the grant tracking accounts with an allocated individual:
-
In the Allocation Method field, select Space Function.
Tracking by allocated individual requires you to create a space function method layer first and then nest an allocated individual layer beneath it.
-
In the Space Functional Category field, select a space functional category that you set up for grant tracking by allocated individual (where Requires Account = Yes and Require Allocated Individual = Yes).
-
In the Space Functional Subcategory field, select a space functional subcategory.
You can select any subcategory; it does not need to be specifically configured for grant tracking.
-
In the Percentage field, enter the percentage for this allocation.
The percentage values you define must add up to 100%.
-
Click Submit to create the space function method layer.
-
Below the space function layer, click the Add Nested Allocation link.
-
In the Allocation Method field, select Allocated Individual.
-
Select an Allocated Individual.
The Accounts pane is added to the bottom of the dialog box.
-
In the Accounts pane, click the Add New link.
The Add Account Detail dialog box opens, allowing you to select values for all the account segments and define the percentage for this account string. Only those segment values that were associated with the selected allocated individual are available.
-
Click OK and define additional account strings, if needed.
-
Click Submit to save the complex allocation method layer.
-